

Building FormPilot: My Journey Creating an AI-Powered Form Filler with RAG, LangChain4j, and Ollama

Have you ever found yourself filling out the same information on web forms over and over again? Name, email, address, phone number, professional bio... it's tedious and time-consuming. Whether it's conference registrations, job applications, or client onboarding forms, we're constantly re-entering the same information across different websites.

In this comprehensive guide, I'll show you how I built FormPilot, an intelligent Chrome extension that utilizes AI to understand form contexts and automatically populate them with relevant information. Unlike traditional form fillers that simply replay saved data, FormPilot leverages:
Retrieval-Augmented Generation (RAG) for personalized, context-aware responses
LangChain4j for elegant LLM integration in Java
Ollama for privacy-preserving, local AI processing
Spring Boot for a robust backend service
By the end of this article, you'll understand how to build your own AI-powered browser extension that can intelligently fill any web form.
The Inspiration
During last year's conference season, I found myself registering for multiple tech events. Each registration required:
Basic information (name, email, company)
Professional details (title, bio, areas of expertise)
Session preferences and dietary restrictions
Emergency contact information
By the fifth registration, I was copying and pasting from a text document - inefficient and error-prone. Existing form fillers either:
Only work with specific fields they recognize
Can't adapt content to different contexts (a bio for a security conference vs. a web development meetup)
Require manual configuration for each new form
The Solution: Context-Aware AI Form Filling
FormPilot solves these problems by:
Understanding form context through field labels, placeholders, and surrounding text
Generating appropriate content based on the specific requirements
Learning from your data using RAG to personalize responses
Running locally for complete privacy and security
The Architecture
I designed FormPilot with two main components:
A Chrome extension that detects forms on web pages and communicates with a local server
A Spring Boot application that uses RAG, LangChain4j, and Ollama to generate appropriate values for form fields
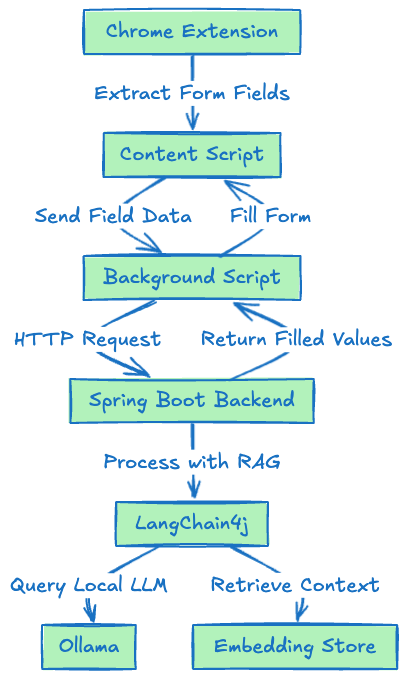
This architecture allows the extension to be lightweight while offloading the heavy lifting of AI processing to the local server. Here’s how the data flows through the system:
The Chrome extension detects a form on a web page
It extracts metadata about each form field (id, name, type, label, placeholder, etc.)
It sends this metadata to the local server
The server uses RAG and LangChain4j with Ollama to generate appropriate values for each field
The server returns these values to the extension
The extension fills the form with the generated values
Getting Started: Setting Up Your Environment
Before we dive into the specific code implementation for FormPilot’s backend, let’s set up the necessary tools: Ollama for running the language model locally and the initial Spring Boot project structure.
Part 1: Installing and Running Ollama Locally
Ollama enables you to run open-source large language models (LLMs) directly on your own machine. This is great for privacy (data stays local) and avoids API costs.
Download and Install Ollama:
Visit the official Ollama website:
https://ollama.com/
Follow the instructions for your operating system:
macOS: Download the .zip file, unzip it, move the app to your Applications folder, and run it once. It installs the command-line tool and runs as a background service (check your menu bar).
Windows: Download and run the .exe installer. It typically sets up Ollama as a background service.
Linux: Use the provided installation script in your terminal:
curl -fsSL https://ollama.com/install.sh | shThis usually sets up Ollama as a
systemdservice.
Verify Installation:
Open your terminal (or Command Prompt/PowerShell) and type:
ollama --versionYou should see the Ollama version number displayed.
Ensure Ollama is Running:
Ollama usually runs automatically in the background after installation on macOS and Windows.
On Linux, you can check its status: sudo
systemctlstatus ollama. If needed, start it with sudosystemctlstart ollama and enable it on boot with sudosystemctlenable ollama.The Ollama server typically listens for requests on
http://localhost:11434
Install an LLM (e.g., Llama 3):
Use the Ollama command line to download the model mentioned in this article (llama3 or deepseek-llm:7b):
ollama run llama3This command will first download the model files (this can take a while) and then load the model, giving you a chat prompt (>>>).
You can exit the chat prompt by typing /bye. The model is now downloaded and available for use by applications like your Spring Boot backend.
To see all locally downloaded models, use:
ollama list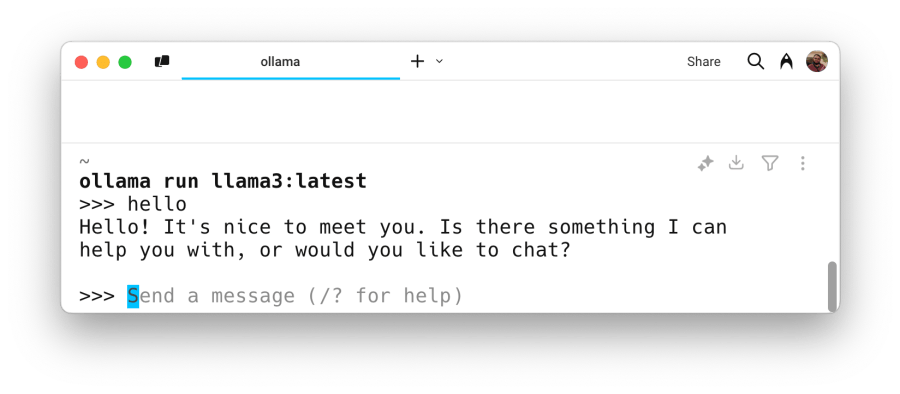
🚀 Quick Start
Want to try FormPilot right away? Clone the repository and follow the setup:
git clone https://github.com/rokon12/form-pilot.git
cd form-pilot
Start the backend
./gradlew bootRun
Install the Chrome extension
Open Chrome and navigate to chrome://extensions/
Enable "Developer mode"
Click "Load unpacked" and select the 'chrome-extension' directory
Or just following the article.
Creating the Spring Boot Project via Spring Initializr
Spring Initializr is a web tool that generates a basic Spring Boot project structure for you.
Visit Spring Initializr:
Open your browser and navigate to https://start.spring.io to configure your project. For brevity, since this part is well-known to every Spring developer, I will skip it.
Download the structure and open it in your favourite IDE.
Make sure you have the following dependencies in your
gradle.buildorpom.xml.
dependencies {
    implementation 'dev.langchain4j:langchain4j-spring-boot-starter:1.1.0-beta7'
    testImplementation 'dev.langchain4j:langchain4j-open-ai-spring-boot-starter:1.1.0-beta7'
    implementation 'dev.langchain4j:langchain4j-embeddings-all-minilm-l6-v2:1.1.0-beta7'
    implementation 'dev.langchain4j:langchain4j-ollama:1.1.0-rc1'

    implementation 'org.springframework.boot:spring-boot-starter-web'

    compileOnly 'org.projectlombok:lombok'
    developmentOnly 'org.springframework.boot:spring-boot-devtools'
    annotationProcessor 'org.projectlombok:lombok'
    testImplementation 'org.springframework.boot:spring-boot-starter-test'
    testRuntimeOnly 'org.junit.platform:junit-platform-launcher'
}
With Ollama running and the basic Spring Boot project created, you’re ready to start adding the FormPilot-specific code.
Implementing RAG with LangChain4j
One of the most exciting parts of building FormPilot was implementing Retrieval-Augmented Generation (RAG) using LangChain4j. RAG is a technique that enhances LLM outputs by retrieving relevant information from a knowledge base before generating a response.
For FormPilot, I wanted the system to be able to fill forms with personalized information. I started by creating a simple text file (content.txt placed in src/main/resources) containing information about conference speakers, including names, bios, contact information, and session details.
Here’s how I implemented RAG in the RAGConfig class:
package ca.bazlur.formpilot.config;

import dev.langchain4j.data.document.Document;
import dev.langchain4j.data.document.DocumentSplitter;
import dev.langchain4j.data.document.parser.TextDocumentParser;
import dev.langchain4j.data.document.splitter.DocumentSplitters;
import dev.langchain4j.data.segment.TextSegment;
import dev.langchain4j.memory.chat.ChatMemoryProvider;
import dev.langchain4j.memory.chat.TokenWindowChatMemory;
import dev.langchain4j.model.TokenCountEstimator;
import dev.langchain4j.model.embedding.EmbeddingModel;
import dev.langchain4j.model.embedding.onnx.HuggingFaceTokenCountEstimator;
import dev.langchain4j.model.embedding.onnx.allminilml6v2.AllMiniLmL6V2EmbeddingModel;
import dev.langchain4j.rag.content.retriever.ContentRetriever;
import dev.langchain4j.rag.content.retriever.EmbeddingStoreContentRetriever;
import dev.langchain4j.store.embedding.EmbeddingStore;
import dev.langchain4j.store.embedding.EmbeddingStoreIngestor;
import dev.langchain4j.store.embedding.inmemory.InMemoryEmbeddingStore;
import lombok.extern.slf4j.Slf4j;
import org.springframework.beans.factory.annotation.Value;
import org.springframework.context.annotation.Bean;
import org.springframework.context.annotation.Configuration;
import org.springframework.core.io.Resource;
import org.springframework.core.io.ResourceLoader;

import jakarta.annotation.PostConstruct;
import java.io.IOException;
import java.nio.file.Files;
import java.nio.file.Path;
import java.util.concurrent.ConcurrentHashMap;

import static dev.langchain4j.data.document.loader.FileSystemDocumentLoader.loadDocument;

@Slf4j
@Configuration
public class RAGConfig {

    @Value("${formpilot.rag.max-results:3}")
    private int maxResults;

    @Value("${formpilot.rag.min-score:0.4}")
    private double minScore;

    @Value("${formpilot.rag.chunk-size:1000}")
    private int chunkSize;

    @Value("${formpilot.rag.chunk-overlap:200}")
    private int chunkOverlap;

    private final ConcurrentHashMap<String, Long> documentVersions = new ConcurrentHashMap<>();

    @Bean
    public TokenCountEstimator tokenCountEstimator(){
        return new HuggingFaceTokenCountEstimator();
    }

    @Bean
    ChatMemoryProvider chatMemoryProvider(TokenCountEstimator tokenizer) {
        return memoryId -> TokenWindowChatMemory.builder()
            .id(memoryId)
            .maxTokens(10_000, tokenizer)
            .build();
    }

    @Bean
    EmbeddingModel embeddingModel() {
        return new AllMiniLmL6V2EmbeddingModel();
    }

    @Bean
    EmbeddingStore<TextSegment> embeddingStore(EmbeddingModel embeddingModel, ResourceLoader resourceLoader) throws IOException {
        log.info("Initializing embedding store with RAG configuration");

        InMemoryEmbeddingStore<TextSegment> embeddingStore = new InMemoryEmbeddingStore<>();

        // Load user data from content file
        Resource resource = resourceLoader.getResource("classpath:content.txt");
        if (!resource.exists()) {
            log.warn("content.txt not found. Creating empty embedding store.");
            return embeddingStore;
        }

        Path contentPath = resource.getFile().toPath();
        Document document = loadDocument(contentPath, new TextDocumentParser());

        // Track document version for potential updates
        documentVersions.put("content.txt", Files.getLastModifiedTime(contentPath).toMillis());

        log.info("Loading document: {} (size: {} bytes)",
            document.metadata().getString("file_name"),
            document.text().length());

        // Configure document splitting for optimal retrieval
        DocumentSplitter splitter = DocumentSplitters.recursive(chunkSize, chunkOverlap);

        // Ingest document into embedding store
        EmbeddingStoreIngestor ingestor = EmbeddingStoreIngestor.builder()
            .documentSplitter(splitter)
            .embeddingModel(embeddingModel)
            .embeddingStore(embeddingStore)
            .build();

        ingestor.ingest(document);

        return embeddingStore;
    }

    @Bean
    ContentRetriever contentRetriever(EmbeddingStore<TextSegment> embeddingStore,
                                      EmbeddingModel embeddingModel) {
        log.info("Creating content retriever with maxResults={}, minScore={}", maxResults, minScore);

        return EmbeddingStoreContentRetriever.builder()
            .embeddingStore(embeddingStore)
            .embeddingModel(embeddingModel)
            .maxResults(maxResults)
            .minScore(minScore)
            .build();
    }

    @PostConstruct
    public void logConfiguration() {
        log.info("RAG Configuration initialized:");
        log.info("- Max Results: {}", maxResults);
        log.info("- Min Score: {}", minScore);
        log.info("- Chunk Size: {}", chunkSize);
        log.info("- Chunk Overlap: {}", chunkOverlap);
    }
}
This configuration:
Creates an in-memory embedding store.
Loads the
content.txtdocument from the project’s resources.Split the document into segments of 1000 tokens with a 200-token overlap (adjust these values based on your content and model).
Converts these segments into vector embeddings using the configured EmbeddingModel and stores them.
Creates a ContentRetriever that will query this embedding store to find the most relevant text segments based on semantic similarity to the input query (e.g., a form field label).
The Magic of LangChain4j’s @AiService
One of the most elegant aspects of FormPilot is how it uses LangChain4j’s @AiService annotation to create a declarative interface for interacting with the LLM. This approach dramatically simplifies the code required to prompt the model and parse its response.
Here’s the FormAssistant interface:
package ca.bazlur.formpilot.service;

import ca.bazlur.formpilot.model.FormField;
import dev.langchain4j.service.MemoryId;
import dev.langchain4j.service.SystemMessage;
import dev.langchain4j.service.UserMessage;
import dev.langchain4j.service.spring.AiService;
import dev.langchain4j.service.spring.AiServiceWiringMode;

import java.util.List;
import java.util.Map;
import java.util.Objects;

@AiService(wiringMode = AiServiceWiringMode.AUTOMATIC)
public interface FormAssistant {

    @SystemMessage("""
        You are FormPilot, an AI assistant specialized in filling web forms intelligently.
        Your task is to generate appropriate values for form fields based on their context and any available user data.

        CRITICAL REQUIREMENTS:
        1. Output ONLY valid JSON - no explanations, no markdown, no additional text
        2. Start your response with '{' and end with '}'
        3. Use the field's 'id' as the JSON key; if empty, use 'name'
        4. Skip fields where both 'id' and 'name' are empty

        VALUE GENERATION PRIORITY:
        1. First, check if relevant data exists in the provided context (RAG data)
        2. If not found, generate realistic values based on field type and context

        FIELD-SPECIFIC RULES:
        - email: Use actual email from context or generate professional format
        - password: Generate strong passwords (min 12 chars, mixed case, numbers, symbols)
        - tel: Format as international (+1-xxx-xxx-xxxx) or match context data
        - date: Use ISO format (YYYY-MM-DD), be contextually appropriate
        - textarea: Generate detailed, contextually relevant multi-sentence content
        - select/radio: Match exact option values (case-sensitive)
        - checkbox: Return "true" or "false" as strings
        - url: Include https:// prefix
        - number: Generate realistic values based on field context

        CONTEXT MATCHING:
        - Match field labels/names with context data semantically
        - "Bio", "About", "Description" → use biography from context
        - "Phone", "Tel", "Mobile" → use phone numbers from context
        - Adapt content tone/length to match form's purpose

        Required fields MUST have values. Never leave them empty.
        """)
    Map<String, String> generateForm(@MemoryId String memoryId, @UserMessage List<FormField> fields);

    @SystemMessage("Analyze the form fields and provide insights about the form's purpose and any potential issues.")
    String analyzeForm(@UserMessage List<FormField> fields);
}
Define the FormField record/class (e.g., in the model package)
package ca.bazlur.formpilot.model;

import lombok.AllArgsConstructor;
import lombok.Data;
import lombok.NoArgsConstructor;

import java.util.ArrayList;
import java.util.List;

@Data
@NoArgsConstructor
@AllArgsConstructor
public class FormField {
    private String id;
    private String name;
    private String type;
    private String label;
    private String placeholder;
    private boolean required;
    private String value;
    private List<Option> options = new ArrayList<>();

    // Additional metadata for better field understanding
    private String autocomplete;
    private String pattern;
    private Integer minLength;
    private Integer maxLength;
    private String min;
    private String max;
}

@Data
class Option {
    private String text;
    private String value;
    private boolean selected;
}
With just this interface and the @AiService annotation (from dev.langchain4j.service.spring.AiService), the LangChain4j Spring Boot starter automatically creates a bean implementing this interface. When you call the generateForm method:
It constructs a prompt using the @SystemMessage and the provided fields list (formatted as the
@UserMessage).The process automatically incorporates the ContentRetriever bean (our RAG setup). LangChain4j handles querying the retriever and adding relevant context to the prompt sent to the LLM.
It sends the combined prompt to the configured LLM (Ollama in this case).
It parses the LLM’s JSON response back into a
Map<String, String>.
This declarative approach keeps the service layer clean and focuses on what needs to be done rather than the low-level details of LLM interaction and RAG integration.
Integrating with Ollama
I chose to use Ollama for the LLM backend, which allows for the local running of LLMs. This provides several advantages:
Privacy: Form data never leaves the user’s computer.
No API Costs: Users don’t need to pay for LLM API usage.
Offline Capability: The system can potentially work without an active internet connection (once models are downloaded).
Configuring LangChain4j to use your local Ollama instance is straightforward using Spring Boot’s application.properties (or application.yml) file located in src/main/resources.
Add the following properties:
spring:
  application:
    name: FormPilot
  jackson:
    serialization:
      indent-output: true

server:
  port: 8080
  servlet:
    context-path: /

# --- Active Ollama Configuration ---
langchain4j:
  ollama:
    chat-model:
      base-url: http://localhost:11434
      model-name: llama3.1:8b
      temperature: 0.2
      timeout: PT120S
      log-requests: true
      log-responses: true

logging:
  level:
    dev.langchain4j: DEBUG

formpilot:
  rag:
    max-results: 3
    min-score: 0.4
    chunk-size: 1000
    chunk-overlap: 200
  security:
    allowed-origins: "chrome-extension://*,http://localhost:3000"
  rate-limiting:
    max-requests-per-minute: 30


# Actuator endpoints for monitoring
management:
  endpoints:
    web:
      exposure:
        include: health,info,metrics
Make sure you have downloaded the specified models using Ollama (e.g., ollama run llama3 or ollama run deepseek-llm:7b).
These properties tell the LangChain4j Spring Boot starter to configure both the chat model (for generating the form values) and the embedding model (for RAG) to use your local Ollama server.
The Rest Endpoint:
package ca.bazlur.formpilot.controller;

import ca.bazlur.formpilot.model.FormField;
import ca.bazlur.formpilot.service.FormAssistant;
import lombok.RequiredArgsConstructor;
import lombok.extern.slf4j.Slf4j;
import org.springframework.http.HttpStatus;
import org.springframework.http.ResponseEntity;
import org.springframework.validation.annotation.Validated;
import org.springframework.web.bind.annotation.*;


import java.util.List;
import java.util.Map;
import java.util.UUID;

@Slf4j
@RestController
@RequestMapping("/api/form")
@RequiredArgsConstructor
@Validated
public class FormFillerController {

  private final FormAssistant formAssistant;

  @PostMapping("/fill")
  public ResponseEntity<?> fillForm(
      @RequestBody List<FormField> fields,
      @RequestHeader(value = "X-Session-Id", required = false) String sessionId) {

    try {
      log.info("Received form fill request with {} fields", fields.size());

      // Generate session ID if not provided
      if (sessionId == null || sessionId.trim().isEmpty()) {
        sessionId = UUID.randomUUID().toString();
      }

      // Log field types for monitoring
      Map<String, Long> fieldTypeCounts = fields.stream()
          .collect(java.util.stream.Collectors.groupingBy(
              FormField::getType,
              java.util.stream.Collectors.counting()
          ));
      log.debug("Field types: {}", fieldTypeCounts);

      // Generate form values
      Map<String, String> filledForm = formAssistant.generateForm(sessionId, fields);

      // Validate response
      if (filledForm == null || filledForm.isEmpty()) {
        log.warn("Form assistant returned empty response");
        return ResponseEntity.status(HttpStatus.NO_CONTENT)
            .body(Map.of("error", "Could not generate form values"));
      }

      log.info("Successfully generated {} field values", filledForm.size());

      return ResponseEntity.ok(Map.of(
          "filledFields", filledForm,
          "sessionId", sessionId,
          "fieldsProcessed", filledForm.size()
      ));

    } catch (Exception e) {
      log.error("Error processing form fill request", e);
      return ResponseEntity.status(HttpStatus.INTERNAL_SERVER_ERROR)
          .body(Map.of(
              "error", "Failed to process form",
              "message", "An unexpected error occurred. Please try again."
          ));
    }
  }

  @PostMapping("/analyze")
  public ResponseEntity<?> analyzeForm(@RequestBody List<FormField> fields) {
    try {
      String analysis = formAssistant.analyzeForm(fields);
      return ResponseEntity.ok(Map.of("analysis", analysis));
    } catch (Exception e) {
      log.error("Error analyzing form", e);
      return ResponseEntity.status(HttpStatus.INTERNAL_SERVER_ERROR)
          .body(Map.of("error", "Failed to analyze form"));
    }
  }

  @GetMapping("/health")
  public ResponseEntity<?> health() {
    return ResponseEntity.ok(Map.of(
        "status", "UP",
        "service", "FormPilot Backend",
        "timestamp", System.currentTimeMillis()
    ));
  }
}
Building the Chrome Extension
The Chrome extension acts as the user-facing part of FormPilot. It needs to:
Detect forms on the current web page.
Extract relevant information about each input field.
Send this information to the local Spring Boot backend.
Receive the generated values from the backend.
Fill out the form fields with the values you received.
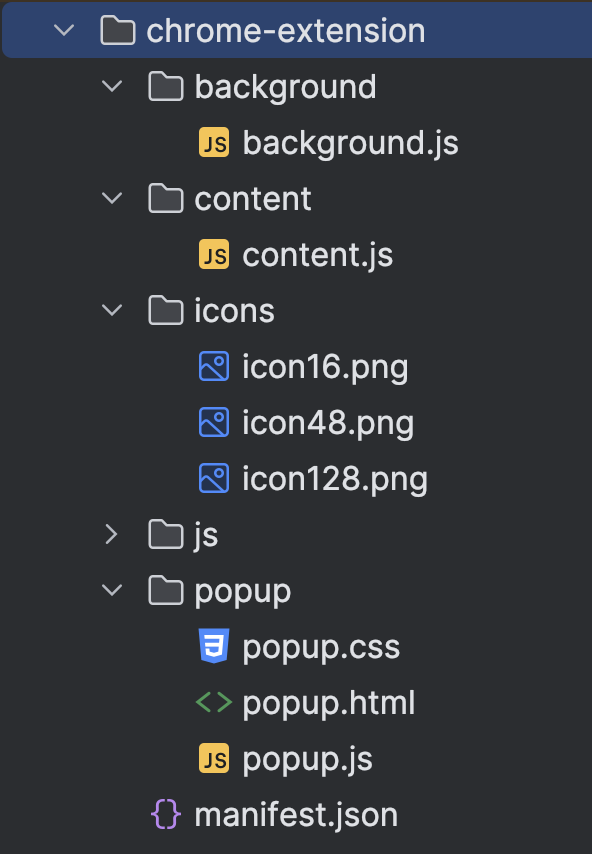
I structured the extension with three main parts:
Content Script (content.js): Injected into web pages to interact with the DOM (find forms, fill fields).
Background Script (background.js or Service Worker): Acts as a central hub, handling communication with the backend server and managing the extension state.
Popup UI (popup.html and popup.js): Provides a simple interface for the user (e.g., a button to trigger form filling).
The most challenging part was reliably detecting form fields and extracting useful metadata, especially labels, as HTML forms vary widely in structure. I implemented several strategies in content.js:
Look for a <label> element with a for attribute matching the field’s ID.
Check if the field is nested inside a <label> element.
Look for a sibling <label> element.
Look at the aria-label or aria-labelledby attributes.
As a fallback, check for preceding non-interactive element text content near the field.
Here’s a simplified snippet illustrating field data extraction:
// content.js (Simplified Example)

function findFormsAndFields() {
  const forms = document.querySelectorAll('form');
  const allFieldsData = [];

  forms.forEach(form => {
    // Select common form input elements within the current form
    const elements = form.querySelectorAll('input:not([type="submit"]):not([type="button"]):not([type="reset"]):not([type="hidden"]):not([type="file"]), select, textarea');

    elements.forEach(element => {
      const fieldData = createFormFieldData(element);
      if (fieldData && !fieldData.value) { // Only include fields that are not already filled
        // Check if field is visible to the user
        if (element.offsetParent !== null) {
            allFieldsData.push(fieldData);
        }
      }
    });
  });
  return allFieldsData;
}

function getLabelForElement(element) {
    // 1. Check for <label for="...">
    if (element.id) {
        const label = document.querySelector(`label[for="${element.id}"]`);
        if (label) return label.textContent.trim();
    }
    // 2. Check for parent <label>
    const parentLabel = element.closest('label');
    if (parentLabel) return parentLabel.textContent.replace(element.value || '', '').trim(); // Attempt to remove element's own text if nested

    // 3. Check aria-label
    const ariaLabel = element.getAttribute('aria-label');
    if (ariaLabel) return ariaLabel.trim();

    // 4. Check aria-labelledby
    const ariaLabelledBy = element.getAttribute('aria-labelledby');
    if (ariaLabelledBy) {
        const labelElement = document.getElementById(ariaLabelledBy);
        if (labelElement) return labelElement.textContent.trim();
    }

    // 5. Fallback: Preceding sibling text (simplified)
    let previous = element.previousElementSibling;
    if (previous && !['input', 'select', 'textarea', 'button', 'label'].includes(previous.tagName.toLowerCase())) {
        return previous.textContent.trim();
    }

    return ''; // No label found
}


function createFormFieldData(element) {
  // Basic check to skip elements we don't want to fill
  const type = element.type ? element.type.toLowerCase() : element.tagName.toLowerCase();
  if (type === 'hidden' || type === 'submit' || type === 'button' || type === 'reset' || type === 'file') {
    return null;
  }

  // Skip if element is disabled or readonly
  if (element.disabled || element.readOnly) {
      return null;
  }

  // Get the current value (to potentially avoid filling already completed fields)
  let value = '';
  if (type === 'checkbox' || type === 'radio') {
      value = element.checked ? 'true' : 'false'; // Represent boolean state
  } else {
      value = element.value || '';
  }


  return {
    id: element.id || '',
    name: element.name || '',
    type: type,
    label: getLabelForElement(element), // Use dedicated function for label finding
    placeholder: element.placeholder || '',
    required: element.required || false,
    value: value // Include current value
  };
}

// --- Communication Logic (Example using Chrome messaging) ---
// This function would be called, e.g., when the user clicks the extension icon

function requestFormFill() {
    const fieldsToSend = findFormsAndFields();

    if (fieldsToSend.length > 0) {
        // Send fields to the background script
        chrome.runtime.sendMessage({ action: "fillForm", fields: fieldsToSend }, (response) => {
            if (chrome.runtime.lastError) {
                console.error("FormPilot Error:", chrome.runtime.lastError.message);
                // Handle error (e.g., show message to user)
                return;
            }
            if (response && response.filledFields) {
                // Fill the actual form elements on the page
                fillFormOnPage(response.filledFields);
            } else {
                console.error("FormPilot: No filled fields received from backend or backend error.");
                // Handle error or empty response
            }
        });
    } else {
        console.log("FormPilot: No suitable empty fields found on the page.");
        // Optionally notify user
    }
}

function fillFormOnPage(filledFieldsMap) {
    // filledFieldsMap is the Map<String, String> from the backend
    console.log("FormPilot: Received fields to fill:", filledFieldsMap);

    for (const [identifier, value] of Object.entries(filledFieldsMap)) {
        // Try finding element by ID first, then by name
        let element = document.getElementById(identifier) || document.querySelector(`[name="${identifier}"]`);

        if (element) {
            fillField(element, value);
        } else {
            console.warn(`FormPilot: Could not find element with id or name: ${identifier}`);
        }
    }
    console.log("FormPilot: Form filling attempt complete.");
}


function fillField(element, value) {
    const tagName = element.tagName.toLowerCase();
    const type = element.type ? element.type.toLowerCase() : tagName;

    console.log(`FormPilot: Filling field (id=${element.id}, name=${element.name}, type=${type}) with value: ${value}`);


    if (type === 'select' || type === 'select-one') {
        // Find the option with matching value or text (case-insensitive text match)
        const options = Array.from(element.options);
        let foundOption = options.find(opt => opt.value === value);
        if (!foundOption) {
            foundOption = options.find(opt => opt.text.toLowerCase() === value.toLowerCase());
        }

        if (foundOption) {
            element.value = foundOption.value;
        } else {
            console.warn(`FormPilot: Could not find option "${value}" for select field (id=${element.id}, name=${element.name})`);
            // Optionally try creating an option if allowed, or skip
        }
    } else if (type === 'checkbox') {
        // Check/uncheck based on truthiness (e.g., "true", "yes", "on", true)
        const shouldBeChecked = ['true', 'yes', 'on', '1'].includes(String(value).toLowerCase());
        element.checked = shouldBeChecked;
    } else if (type === 'radio') {
        // For radio buttons, find the one in the group with the matching value and check it
        const radioGroup = document.querySelectorAll(`input[type="radio"][name="${element.name}"]`);
        radioGroup.forEach(radio => {
            radio.checked = (radio.value === value);
        });
    } else {
        // For text inputs, textareas, email, password, number, date, etc.
        element.value = value;
    }

    // IMPORTANT: Trigger events to simulate user input, which many frameworks rely on
    triggerEvents(element);
}

function triggerEvents(element) {
    // Events commonly listened for by frameworks (React, Vue, Angular, etc.)
    const eventsToTrigger = [
        new Event('input', { bubbles: true, cancelable: true }),
        new Event('change', { bubbles: true, cancelable: true }),
        new FocusEvent('focus', { bubbles: true, cancelable: true }), // Simulate focus first
        new FocusEvent('blur', { bubbles: true, cancelable: true })   // Then blur
    ];

    // Dispatch focus first
    element.dispatchEvent(eventsToTrigger[2]);

    // Dispatch input and change
    element.dispatchEvent(eventsToTrigger[0]);
    element.dispatchEvent(eventsToTrigger[1]);

    // Dispatch blur last
    element.dispatchEvent(eventsToTrigger[3]);
}

// --- Listener for messages from background or popup ---
chrome.runtime.onMessage.addListener((request, sender, sendResponse) => {
    if (request.action === "triggerFormFill") {
        console.log("FormPilot: Received triggerFormFill command.");
        requestFormFill();
        // Indicate async response if needed, though maybe not for this simple trigger
        // sendResponse({ status: "Form fill initiated" });
        return true; // Keep message channel open for potential async response from requestFormFill if it used sendResponse
    }
});

console.log("FormPilot Content Script Loaded.");
The background script (background.js) would handle the chrome.runtime.onMessage listener for the “fillForm” action, make a fetch request to the local Spring Boot server (http://localhost:8080/api/fill-form or similar), and send the response back to the content script. Remember to configure CORS in your Spring Boot application to allow requests from the Chrome extension’s origin.
Check out the chrome-extension: https://github.com/rokon12/form-pilot/tree/main/chrome-extension
Setting up the Spring Boot Server
Build the Spring Boot application:
./gradlew buildRun the Spring Boot application:
./gradlew bootRunThe server will start on port 8080. You can verify it’s running by visiting:
http://localhost:8080/api/form/healthSetting up the Chrome Extension
Open Google Chrome and navigate to:
chrome://extensions/Enable “Developer mode” by toggling the switch in the top right corner.
Click “Load unpacked” and select the
chrome-extensiondirectory from this project.The extension should now be installed and visible in your Chrome toolbar.
Using the Demo Form
A demo form is included in this project to help you test the Smart Form Filler extension:
Create the demo form and open it in your browser: file:///path/to/FormPilot/demo/demo-form.html
Alternatively, you can serve the demo form using a simple HTTP server:
# If you have Python installed
python -m http.serverThen visit http://localhost:8000/demo/demo-form.html in your browser.
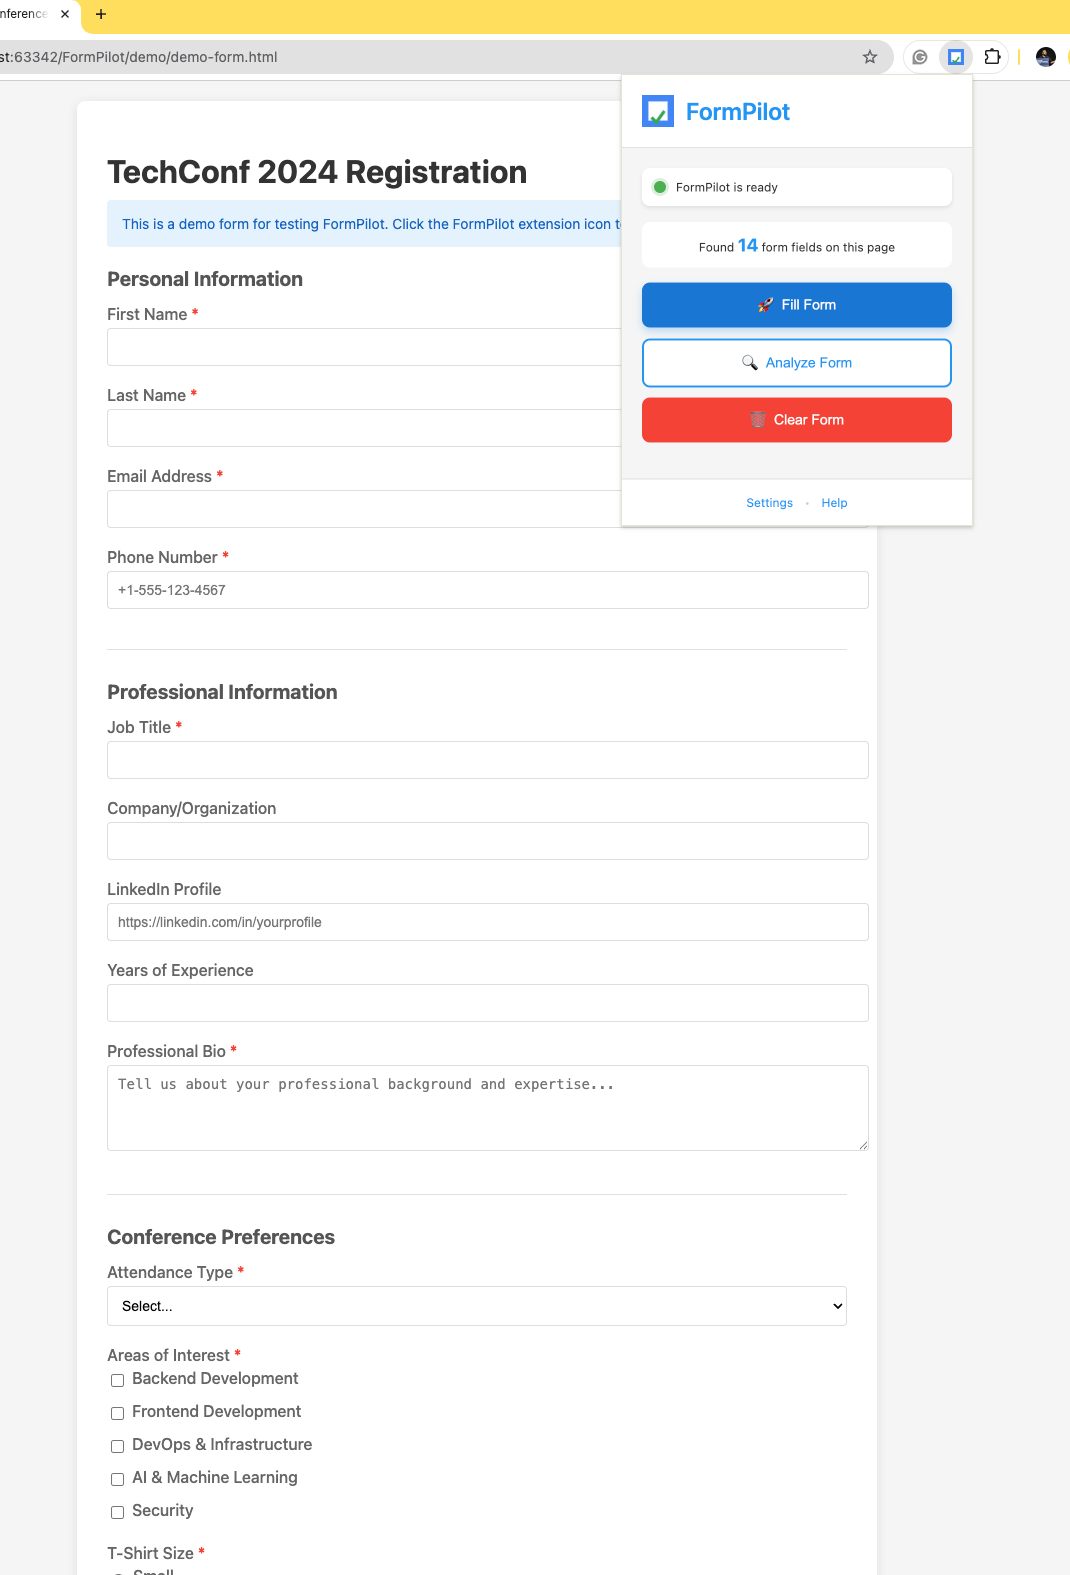
With the Smart Form Filler extension installed and the local server running, the extension should automatically detect the form fields on the demo page.
You can manually trigger form filling in two ways:
Click the extension icon in your Chrome toolbar
Right-click on the page and select “Smart Form Filler” from the context menu, then choose “Fill Forms”
Testing with a Demo Form
To test FormPilot thoroughly, I created a comprehensive demo HTML form (demo.html) that included a wide variety of field types:
Text inputs (First Name, Last Name, Address Line 1)
Email input
Password input
Telephone input (tel)
Date input
Number input (Age)
Select dropdown (Country)
Radio buttons (T-Shirt Size)
Checkboxes (Interests)
Textarea (Comments/Bio)
Using this demo form locally allowed me to iterate quickly on both the backend logic (ensuring correct values were generated for each type) and the frontend JavaScript (ensuring fields were detected and filled correctly, including event triggering).
Challenges and Solutions
Building FormPilot wasn’t without its hurdles. Here are some key challenges and how I addressed them:
Challenge 1: Robust Form Field Detection & Label Association
As mentioned, reliably finding input fields and their corresponding labels across diverse HTML structures is tricky.
Solution: Implemented a multi-strategy approach in content.js (checking for attribute, parent labels, aria-label, siblings) as shown in the snippet. Added checks for visibility (offsetParent !== null) and avoided filling already completed fields. It’s not perfect, but covers many common patterns.
Challenge 2: Handling Diverse Field Types Correctly
Simply setting element.value doesn’t work for all types (selects, checkboxes, radio buttons).
Solution: Created specific logic within the fillField function in content.js to handle different type
attributesortagName. For selects, it searches for matching option values or text. For checkboxes/radio buttons, it sets the checked property based on the received value.
Challenge 3: Triggering JavaScript Events for Framework Compatibility
Modern web apps heavily rely on JavaScript frameworks (React, Vue, Angular) that listen for input events (input, change, blur, focus) to update their internal state. Just setting the field’s value programmatically often doesn’t trigger these listeners.
Solution: Implemented the triggerEvents function in content.js to manually create and dispatch input, change, focus, and blur events on the element after setting its value. This significantly improves compatibility with framework-based forms.
Challenge 4: Backend Communication & CORS
Chrome extensions have security restrictions. Content scripts cannot directly make cross-origin requests (like to http://localhost:8080).
Solution:
The content script sends a message to the background script.
The background script (which has fewer restrictions) uses the fetch API to call the Spring Boot backend.
Crucially, the Spring Boot application must be configured to handle Cross-Origin Resource Sharing (CORS) by sending the appropriate headers (e.g.,
Access-Control-Allow-Origin:chrome-extension://YOUR_EXTENSION_ID). This can be done globally using@ConfigurationandWebMvcConfigureror on specific@RestControllerendpoints using@CrossOrigin.
Challenge 5: Prompt Engineering & Model Compliance
Getting LLMs to follow detailed instructions exactly,especially when it comes to the output format and using logic like “try RAG first”, can be tricky.
Larger models like OpenAI’s GPT-4o usually follow detailed system instructions well, including sticking to strict JSON formats and trying RAG before generating answers. However, smaller models running locally with Ollama (like llama3 or deepseek-llm:7b) may not always do the same. They might add extra text outside the JSON, miss when they should use RAG, or create less accurate data for certain fields.
Solution: You often need to fine-tune the prompt to get better results with smaller models. This means making the system instructions clearer and simpler, giving good examples of the exact format you want, and even adding warnings like, “Don’t write anything before or after the JSON.” Sometimes, it also helps to add a cleanup step in your Java backend—like extracting just the JSON from the output—even if the model includes extra text. It’s a balance between how powerful the model is, how complex your prompt is, and how much cleanup you’re willing to do afterward.
Lessons Learned
This project was a fantastic learning experience, reinforcing several key concepts:
1. The Power of RAG for Contextual Personalization
Implementing RAG was the most impactful part. Instead of generic placeholders, FormPilot could potentially pull my actual bio or project details from the content.txt file when filling out a relevant field. This moves beyond simple auto-fill to context-aware generation, making the tool significantly more useful. The quality depends heavily on the relevance of the data source and the effectiveness of the embedding model and retrieval parameters.
2. LangChain4j Simplifies Java LLM Integration
LangChain4j, especially with its Spring Boot starter, abstracts away much of the complexity of interacting with LLMs and integrating RAG. The @AiService annotation is incredibly powerful, allowing a declarative approach that keeps the business logic clean and focuses on the desired interaction rather than the plumbing.
3. Local LLMs (Ollama) Offer Privacy & Control
Using Ollama provided complete control over the model and ensured user data privacy, which is paramount when dealing with potentially sensitive form information. It also decouples the application from reliance on third-party API keys and costs, although it requires users to have sufficient hardware resources. The ease of switching models locally (just change application.properties and run ollama run <new_model>) is also a plus for experimentation.
4. Chrome Extension Development
Building the Chrome extension highlighted the importance of understanding the different script contexts (content, background, popup), their capabilities, and limitations (especially around DOM access and network requests). Proper event handling (triggerEvents) is essential for compatibility with modern web applications. Careful consideration of permissions and security (like CORS) is mandatory.
Conclusion
This a demonstration of how modern AI techniques like RAG can be combined with frameworks like LangChain4j and local LLMs via Ollama to create genuinely intelligent tools within the familiar Java ecosystem. It moves beyond simple automation to provide context-aware assistance for repetitive tasks like filling forms.
The journey highlighted the power of abstraction provided by libraries like LangChain4j and the increasing accessibility of running powerful LLMs locally. While challenges exist, particularly in reliably interacting with the diverse landscape of web forms, the potential for AI-driven productivity tools like FormPilot is immense.
The combination of a browser extension frontend and a local AI backend offers a compelling architecture for building privacy-preserving, intelligent applications.
If you’re interested in exploring the code further or contributing, you can find the project on GitHub form-pilot.
Feel free to fork it, experiment, and adapt it. I’d love to hear your feedback and suggestions!
Finally….
Ready to build your own AI-powered browser extension?
Clone the repository: github.com/rokon12/form-pilot
Follow the setup guide in this article
Customize for your needs - add your own data, adjust prompts, extend functionality
Share your improvements - PRs welcome!
💡 Pro Tip: Star the GitHub repository and consider contributing improvements back to the community!
Resources
Happy (and smarter) form filling!
And don’t forget to buy me a coffee if you like the the content: